The ultimate boerewors/drywors making guide
Boerewors is made from coarsely minced beef (sometimes combined with minced pork, lamb, or both) and spices (usually toasted coriander seed, black pepper, nutmeg, cloves and allspice). Like many other forms of sausage, boerewors contains a high proportion of fat, and is preserved with salt and vinegar, and packed in sausage casings. Traditional boerewors is usually formed into a continuous spiral. It is often served with pap (traditional South African porridge / polenta made from mielie-meal). Boerewors is also very common throughout Namibia, Botswana, Mozambique and Zimbabwe as well as with expatriate South African communities worldwide.
1. Rinse your casings.
It is essential to rinse all visible salt off the casings. Do this by running the casing under the tap using cold water. Try to massage between the folds. Do not remove the casing from the tube provided.


2. Soak your casings.
Once rinsed, you must soak your casings in fresh, warm water, ideally 37°C (which is your body temperature). Make sure they are fully submerged and avoid water any hotter than 40°C. Soak your casings for at least 45 minutes. Alternatively, casings can be soaked overnight in cold tap water.
3. Chill everything.
One of the most important things to remember when making sausages is to keep everything cold. A great tip from Matty Matheson is to use meat and fat that is ‘almost frozen’ – in his own words ‘if you grind meat that is warm or room temp it will turn into sludge, cold meat just grinds really nice’. This is because warmth ruins the emulsification (structure) of the meat and prevents both liquid and fat from absorbing into the meat. This leads to a dry, crumbly and less flavourful sausage. We recommend putting your meat or sausage mix and also your grinder blade and plate into the freezer for a minimum of 20 minutes before you start your grinding and sausage making. If you have a large batch of meat, keep anything you can’t fit into your grinder/sausage maker in the fridge until you need it.
4. Toast your spices
If your recipe contains any spices then toast them in a skillet over medium heat until slightly golden and you can smell them. This releases the flavour from the spices.
Some of the great pre-made spice we have include:


5. Prepare your meat.
Trim and discard any hard fat and nerves from the meat. Cut meat and fat into small cubes (about 2.5cm/1 inch).
6. Mix meat and seasonings.
Using your hands, combine the diced meat, fat, salt, pepper and any other ingredients (herbs, spices, garlic, mustard etc) except for any liquid (stock, beer, wine, cream, eggs etc) in a big mixing bowl. Give it a really good mix through - this will ensure the spices/flavour is distributed evenly throughout your sausage.
7. Grind your meat mix.
Grinding your sausage meat is a key sausage making step and although it's pretty hard to completely stuff it up, your choices here will impact the texture of your final sausage. Simply put, finely ground meat = a smoother sausage with finer and softer texture and no visible 'bits' eg a saveloy or hot dog. Coarsely ground meat = coarser sausage with more visible 'bits' and a more 'crumbly' texture.
We always recommend grinding twice. This will help with the your sausage bind together. Grinding the first time with a coarse 10mm / 3/8" plate, then following with a 4.5mm / 3/16" plate is a good medium grind choice. Gradually feed meat into the grinder, combining it with pieces of fat to achieve an even blend of meat and fat. Make sure you chill your meat in-between grinds (put in freezer for minimum 20mins).
8. Give everything a good mix.
Add any liquid or eggs to the minced mixture and thoroughly mix the meat and spices by hand (preferable) in an oversized bowl or in your electric mixer using a paddle attachment for at least 2-4. This is a really important step as it helps the sausage bind, so don't be tempted to take short cuts. Keep mixing until the sausage mix starts getting sticky. You know the mix is ready when you grab a handful and tip your hand upside down. If it sticks to the palm of your hand it is ready.
9. Pack your sausage stuffer.
Assemble your sausage stuffer. Wet the inside or your meat canister with some water or a little oil (this stops the meat from sticking). Place the sausage mix into the stuffing machine sausage meat canister. Press down and compact the meat to get rid of any air pockets. Put any meat that doesn’t fit back into the fridge until you are ready for it.
10. Get the right sized nozzle.
Different sized casings need a different sized sausage maker nozzle (also known as funnel, stuffing tube or stuffing horn), otherwise you could get tearing in your casing. Sheep casings require a smaller nozzle than hog casings. For our 19-21mm sheep casings we strongly recommend a 10-13mm nozzle (13mm is the width/diameter of the nozzle at its tip). For our 24-26mm sheep casings use 13-16mm/0.5"nozzle. For our hog casings use a 19-25m/0.75"-1" diameter nozzle.
11. Thread your casing onto the nozzle.
Our casings have been threaded onto a pipe for easier use. Remove the casing from the water and slide the casing tube onto the piping nozzle. You can dab a bit of vegetable oil on the end of the casing and nozzle to make this easier. Slide the casing off the casing tube onto the nozzle until you come to the other end of the casing. Tie a knot in this end of the casing and slide the knot right up against the end of the nozzle. You are ready to start filling.
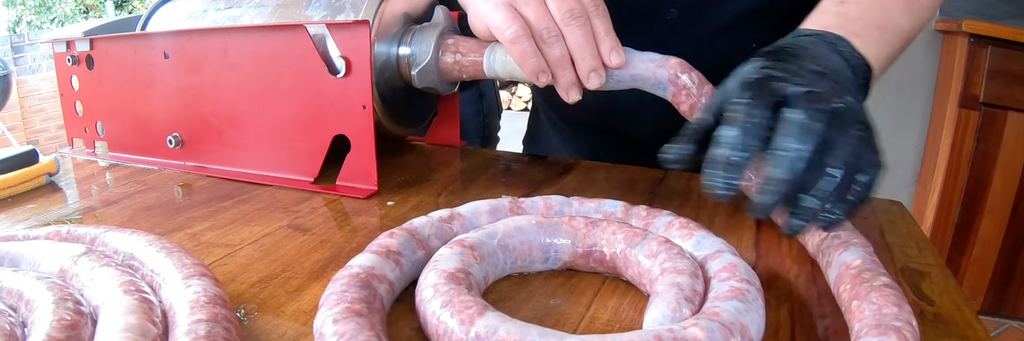
12. Fill your sausages.
Press the knot at the end of the sausage casing firmly against the end of the sausage nozzle. Begin piping the sausage mix into the casing, ensuring the meat is filling the casing evenly. Maintaining some pressure on the meat in the feeder will help and will prevent air bubbles in your sausages. Pinch the casing every 15cm/6 inches to make a space to later create links in the sausages. When all the meat is fed into the casing, turn off the machine and tie a secure knot at the end of the casing. The amount of fill is a balancing act you will get better at it the more times you do it. Ideally, you want to find the sweet spot where the casing is filled with meat and a little amount of air remains but not so full that it will burst when you begin twisting or the skin will snap open when you cook it. However, generally speaking, it’s better to very slightly over-stuff than under-stuff your sausages, since some fat and moisture will escape during cooking, making the meat shrink.
13. Make the links.
To make the links in your sausage, pinch and twist the filled sausage casing with thumb and forefinger approximately 15cm/6 inch apart, then spin the sausage between your fingers (kind of like a skipping rope). Move your way along the filled casing, making sure to spin the sausage in alternating directions for each sausage.
14. Hang your sausages.
Once you’ve mastered all of that, your sausages need to be hung in a cool, dry place for around 24 hours. This gives the casings time to dry out, and the flavours time to steep and develop to their full potential.
15. Get out your BBQ and cook the little beauties up.
Remember not to prick your sausages or cook too hot, otherwise your sausage casing may split and all your beautiful sausage juices (fat) and flavours will escape, making your sausage dry.
Article courtesy of NZ Casings
Have you got the right grid? We have several options for you


